Wednesday, November 20, 2013

Hazelnut and Cocoa Nib Granola


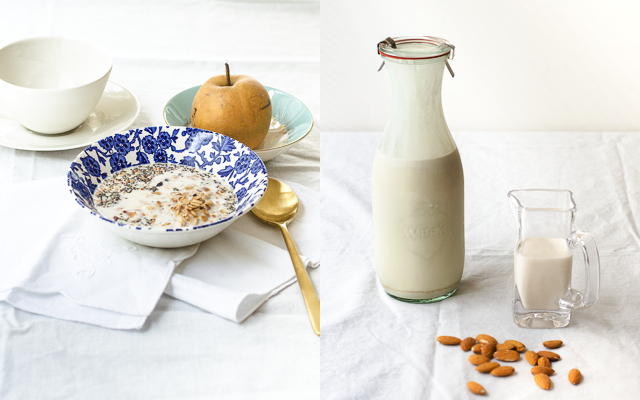
One of my favorite granola is made by the Seattle-based Marge Bakery and it features oats, filberts and coconut baked at low temperatures and tossed with cacao nibs. It goes extremely well with strawberries and almond milk and I love the slightly warm hint of cardamom in the background. Unfortunately, the granola also costs an insane amount for reasons I'm not particularly sure of. I think it averages out to almost a dollar an ounce!

I've attempted to recreate this in my own kitchen, and I'm rather happy to report that it's quite a passable replication. One of the irritating things about store-bought granola is the meager amounts of the 'good stuff' that gets included i.e. nuts, berries and seeds are often overwhelmed by brown sugar and cheap oats. With homemade granola, you can always add or subtract things that you like, so feel free to add dried blueberries or cranberries or substitute the nuts to turn this into your own personalized granola. The granola is baked at very low heat so it turns out crispy.

My recipe here differs slightly from Marge Bakery's in that I'm using slightly more nuts and cardamom. Marge Bakery also uses only maple syrup, but I love the flavor of Ballard Bee's local raw honey which, when coupled with a small amount of vanilla powder, lends a mellowly sweet, floral undertone to the granola. It must be said here that vanilla powder is one of those things that when you start using, you'll never want to give up. I use it in lieu of vanilla extract in all my baked goods now, and it looks and tastes so much better than its alcohol-infused counterpart.

With the exception of the Oregon filberts (just substitute regular hazelnuts), most of the ingredients used here is available online through Amazon.com or your local health store. I recommend using organic ingredients when you can find them just because that's what I personally use, but conventional grown works just fine. 

Hazelnut and Cacao Nib Granola (inspired by Marge Bakery)
Makes 12oz

2 cups organic rolled oats
1/4 cup chopped raw Oregon filberts
1/4 cup chopped raw walnuts
1/4 cup white sesame seeds
1/4 cup organic unsweetened coconut flakes
1/4 cup organic maple syrup, Grade B
1/4 cup local honey
1/4 cup cold-pressed olive oil (or grapeseed oil)
1/8 teaspoon cardamom
1/8 teaspoon vanilla powder (or 1 teaspoon vanilla extract)
1/8 teaspoon sea salt
1/4 cup raw cacao nibs

Preheat oven to 250°F. Mix all ingredients except cacao nibs in a large bowl, stir to combine. Spread in a single layer on a sheet pan lined with parchment paper. Bake for 15 minutes at 250°F. Flip granola, bake for another 15 minutes. 

Remove from oven, let cool, then mix in cacao nibs. Store in airtight jars for up to two weeks.

Wednesday, November 13, 2013

Semi-homemade ramen

DSC_0225

DSC_0220

After touting how much I eat ramen (see sidebar -->), I received a request from reader Angelica for a ramen recipe that was easy for a busy schedule. I have in the past gone crazy with making my own noodles from scratch and slaving away for 24 hours to achieve that perfectly flavorful tonkotsu broth, but I think there is a vast realm of possibilities with even dried, store-bought ramen noodles.

This is going to sound really weird, but I need weekly ramen fixes. It gives me a sense of comfort and a slight endorphin rush when I sit down to a warm bowl of noodles steeped in salty broth. More often than not, I'm contented with a very simple iteration, just noodles, egg and some vegetables and it constitutes a satisfying meal.

My favorite dried ramen noodles is manufactured by Wu-mu, a Taiwanese brand. Nong shim, which manufactures Shin Ramyun also makes passable noodles that approximates the fresh stuff. Both these brands make noodles that are chewy and don't fall apart in the broth. I buy the packages of ramen that come with flavorings, but I usually just throw them away since they are extremely salty and contain a massive amount of MSG.  You can find both brands easily at any Asian market. 

I sometimes stock up on fresh ramen from a local Seattle joint (Samurai Noodles). They also sell ramen kits and toppings. If you have a good ramen shop around your area, it's worthwhile to ask if they can just sell you the noodles, which you can then wrap in plastic and freeze. Again, the same holds true for fresh and dried noodles - they should cook to al dente perfection, not taste excessively floury or like alkaline. In this recipe, I also used marinated bamboo shoots that I bought a few weeks ago from Samurai, but you can find canned versions in most Asian market. Otherwise just substitute with canned baby corn.

If you're interested in making ramen from scratch, I would recommend starting off with an extremely easy and flavorful recipe from Nancy Singleton Hachisu's 'Japanese Farm Food'. My recipe, considering that it's meant to be semi-homemade, makes use of ingredients that you can easily find in most grocery stores these days. You can substitute every single ingredient in this recipe (except the ramen and broth) and still come out with a fantastic easy weekday lunch or dinner.  I use Better Than Bouillon's organic broth pastes for most of my broth needs, and I think it approximates what homemade stock should taste like, more so that things can come out of a carton.

Semi-homemade ramen 
Makes 1 serving

1 piece dried ramen
1 cup seasoned chicken broth (vegetarians can use vegetable broth or just use regular chicken broth)
1 teaspoon sweet miso (the lighter colored soy variety)

Toppings
1/4 cup sliced, cooked chicken (or 1/4 cup sliced mushrooms) - see below
1/4 cup marinated bamboo shoots, or water chesnuts
1/2 cup green leafy vegetables (I used gai choy, but you can use spinach, choy sum or bok choy)
1/4 cup canned or frozen corn 
1/4 cup enoki mushrooms
4 slices nori (roasted seaweed)
1/2 hard-boiled egg
1 tablespoon thinly sliced green onions
1/2 teaspoon ra-yu (la-yu or hot chilli oil)
Shichimi Togarashi (optional)

Bring a big pot of water to a boil. Add a heaping spoon of salt. Blanch the leafy vegetables and remove with a spider strainer. If using frozen corn, blanch the corn and remove with spider strainer. Do the same with the enoki mushrooms. Blanching needs only about 30 seconds. Cook noodles according to package directions.

In the meantime, bring the seasoned chicken broth to a slight simmer in a small saucepan (or just nuke in a bowl in the microwave). Whisk in miso paste.

In a bowl, place cooked noodles and top with hot broth. Arrange all the toppings, serve with Shichimi Togarashi on the side and slurp.

Seasoned Chicken or Vegetable Broth
Makes 4 servings

4 cups chicken broth or vegetable broth
Handful kezuribushi (shaved bonito flakes) or a 1 teaspoon fish sauce or 1 teaspoon soy sauce
2 pieces skinless, boneless chicken thighs or about 10 crimini mushrooms

Simmer the chicken and kezuribushi in the broth until chicken or mushroom is cooked through. Remove the chicken or mushroom from the broth, let cool and sliced thinly for use in the ramen recipe above. 

Tuesday, November 5, 2013

Kale, Coconut & Ginger Smoothie

DSC_0206

I started eating a raw diet twice a week and drinking green smoothies for breakfast after a summer of intensive traveling and weeks on end of unhealthy.  My travels brought me to Brazil where I spent days on end drinking light lager, eating piles of rice and seafood and finishing off with giant slices of coconut cake. Unfortunately, that excess and gluttony also led to severe acne, bloating and sluggishness.

My raw food bible is 'Everyday Raw Detox' by Meredith Baird & Matthew Kenney. I have no idea who these people are, except that Matthew Kenney is apparently a very well known raw food chef and owns several raw food restaurants. The thing that drew me to the book is that it contained recipes that I could very well replicate in my kitchen, and they were actually recipes that I would eat happily without gagging. The book is also littered with beautiful pictures and interesting blurbs about nutrition which makes for a very pleasant read.

Another book that helped me combat the general feeling of unhealthiness and skin problems is 'The Green Smoothie Bible' by Kristine Miles. This book is slightly less frou-frou, and comes in a very basic, pared down format with no pictures. But the best thing about this book is that it has a wealth information to help one get started on green smoothies, including ingredients to use and the various kinds of superfoods you can incorporate to give your smoothies a further health boost.

I'm sure that eating any kind of vegetables on a regular basis, regardless of form, is the reason why I started feeling slightly better and my skin cleared out tremendously. I don't think green smoothies or a raw diet is particularly groundbreaking or the be all end all for a healthy lifestyle, but it certainly is a good and less tedious way of ensuring that one gets plenty of vegetables in. I've even converted my kale-hating husband into a smoothie fan by simply pulverizing other things he likes better to cover up the taste.

I'm posting my go-to recipe which is a great way for someone to get started on green smoothies. I would highly recommend the two aforementioned books if you're looking to get into blending and raw food for the long term, and I will probably be posting some recipes out of those book in the future. But since this recipe is mostly for a long time Assembled Hazardly reader, Sarah, I'm posting something very basic that I truly love and used on multiple occasions to convert ardent carnivores to the beauty of green smoothies.

This calls for coconut meat and coconut water which you can get fresh and whole, otherwise, canned or packaged coconut water will work as well. Frozen coconut meat is available in Asian markets, and if all fails, substitute with unsweetened coconut flakes (soaked in coconut water for about two hours) or coconut butter.

Kale, Coconut & Ginger Smoothie
Makes two 16 oz servings

2 cups chopped kale (frozen also works)
1 cup fresh coconut meat (or 2 tablespoons coconut butter)
3 cups coconut water
1 banana, peeled
1 knob ginger (size depends on how spicy you like it, I use a knob about twice the size of my thumb)
1 tablespoon local honey or agave
Juice of 1/2 a lime
1 cup ice

Chuck in the specific order listed, blend until smooth and serve. I love my Vitamix for smoothies because it's powerful enough to blend things in a smooth liquid. Most blenders with ice-crushing capabilities should be able to give you a good enough consistency, but you may find that some blenders produce a gritty texture.

Monday, November 4, 2013

Roasted Cauliflower and Leek Soup

DSC_0188
Pillivuyt onion soup bowls, Sabre Natura flatware

I'm not the biggest fan of cauliflower because I find it completely bland and uninspirational - it's the lesser cousin of broccoli and the unfortunate spawn of the cabbage. There is a reason no one ever talks about the cauliflower - it's dull and only works with bacon or cheese in a regular meal. That being said, being part of a local and seasonal delivery service forces me to do interesting things with vegetables I would otherwise blatantly ignore (beets are another horrifying example).

This cauliflower soup recipe has been my go-to for years and years because it's really, really easy and quick, and a really good way to spend the evening on a cold night with a bottle of wine. It's the best way to get rid of excess cauliflower (like when your mother decides one year to go on a mad cauliflower growing spree). The cauliflower in the soup is still as dull, but throwing in a little bit of curry powder and gruyere makes this enjoyable. A lot of people use heavy cream to make things palatable, but I'm using a russet potato to make it healthier - you're not really missing out on anything, and the extra vegetables actually lends some complexity. You can also sauté some bacon and chuck in with the veges while it's roasting, it tastes heavenly, but since I'm trying to drop a few pounds, I'm putting my bacon love on hold.

And apparently cauliflower is good for prostate health, so there, eat your cauliflower.

Roasted Cauliflower and Leek Soup 
Makes 4 servings
Time: About 1 hour (15 mins prep, 45 mins cook)

1 head cauliflower
1 large leek (white and light green parts only)
1 medium carrot
1 large russet potato
2 tablespoons olive oil
1 clove garlic
1 teaspoon Madras curry powder
1 teaspoon dried thyme
1 bay leaf
6 cups chicken or vegetable broth
1 teaspoon ground pepper
1/2 teaspoon truffle salt (or regular sea salt, or smoked salt)
Gruyere or chopped roasted hazelnuts and chopped parsley to serve
  1. Rough chop the cauliflower, leek, carrots and potato. In a large bowl, toss with olive oil, peeled garlic,  madras curry powder and dried thyme. Spread on a parchment line baking sheet and roast at 400F for about 30 minutes until vegetables are tender and browned. 
  2. In the meantime, heat the broth and bay leaf in a soup pot.  Toss the roasted vegetables into the pot and simmer, covered for about 15 minutes until vegetables are very tender. 
  3. Blend with an immersion blender (or a regular blender) until the soup is a creamy consistency but still with some small vegetable chunks visible. 
  4. If using gruyere: Use oven-proof bowls. Ladle soup and top with strips of gruyere, then flash under the broiler for a few minutes until cheese is melted and browned. 
  5. Garnish with hazelnuts and/or parsley. I like my soups less salty, so the seasoning listed is just a ballpark -- add or subtract according to taste. 

Friday, November 1, 2013

Homemade Almond Milk

almondmilk
Mud Australia cup & saucer, Burleigh Alden cereal bowl, Mepra Linea Oro spoon, vintage bowl, Weck juice jar, Simon Pearce Woodbury creamer

My desire for homemade almond milk stems from two things: 1) Making lattes for a husband who is deathly allergic to dairy and 2) Store-bought, pre-packaged almond milk often tastes like gummy water. Ever since I bought a Vitamix, I've found it really easy to make fresh batches of almond milk every week. I like it so much, I've started to substitute it for milk in my morning cereal and hot chocolate. 

I use raw, unpasteurized almonds from Massa Organics (a small rice farm in Northern California) because I also buy their brown rice and order bulk almonds from them out of convenience. By law, "raw almonds" from California sold in stores have to be steam pasteurized. I'm not entirely convinced that pasteurization kills all the nutrients in almonds but this site certainly seems to think so. Europeans do not pasteurize their almonds, so I can't imagine why we need to, other than some random salmonella outbreak a few years ago. Anyway, use whatever unroasted, unsalted, whole almonds you can find. I have to point out, however, that the almonds from Massa Organics are  one of the best I've ever tasted and for some reason, produces silky, thick almond milk. Please support them if you can.

Soaking the almonds overnight helps break down the enzymes in the skin and make it easier to digest - sort of the same reason why many people advocate sprouting grains and seeds. I add dates as a sweetener and some coconut butter for flavor, but you can also use any kind of sweetener you want, though adding white sugar negates the health benefits I guess. I would recommend maple syrup or coconut nectar as other options. The recipe I use yields a very mellow, slightly sweet almond milk with a thick, creamy consistency almost like whole milk but you can add an extra cup of water to thin it out. I've own a few different blenders before and while they all work fine for making nut milk, the Vitamix is powerful enough to pulverize the nuts finely, yielding more of the final product. 


Homemade Almond Milk
Makes about 1.5 quarts or 1.5L

2 cups raw almonds, soaked overnight (or at least 12 hours)
6 cups (48oz.) of filtered water 
4 organic Medjool dates, pitted
1 tablespoon coconut butter (optional)
1/2 teaspoon vanilla powder (or 1 teaspoon vanilla extract)
Pinch of sea salt

Blend all ingredients together at high speed until the mixture reaches a thick, foamy consistency. Strain through nut bag and store for up to a week in glass containers. 

The left over pulverized almonds can be used to make almond meal (chuck it in the oven at the lowest setting for 24 hours, grind finely and store in refrigerator). I also use them in making my pear and ginger tart